okhttp源码解析

Read the fuck source code
阅读源码吧

参考:

感谢前人的总结, 才能让我将源码阅读的那么顺利.

准备

okhttp是使用mavn构建的, 推荐先将github上的源代码clone下来, 然后使用IntelliJ IDEA导入之后阅读, 因为使用IDE在源码间跳转十分方便, 而且能很方便的查看某个变量或者某个方法在哪些地方被调用了.编译成功是这个样子的

使用实例

现在我们打开Android Studio,
导入依赖

1
compile 'com.squareup.okhttp3:okhttp:3.10.0'

使用okhttp写一个简单的请求

1
2
3
4
5
6
7
8
9
10
11
12
13
14
15
16
17
OkHttpClient client = new OkHttpClient.Builder().build();
Request request = new Request.Builder().url("https://www.toutiao.com/search/suggest/initial_page/").build();
Call call = client.newCall(request);
// 同步请求
call.execute();
// 异步请求
call.enqueue(new Callback() {
@Override
public void onFailure(Call call, IOException e) {

}

@Override
public void onResponse(Call call, Response response) throws IOException {

}
});

OkHttpClient

首先我们看OkHttpClient这个类.
client一般有两种创建方式

1
OkHttpClient client = new OkHttpClient();

或者

1
OkHttpClient client = new OkHttpClient.Builder().build();

我们看第一种的构造函数

1
2
3
4
5
6
7
8
9
10
11
12
13
14
15
16
17
18
19
20
21
22
23
24
25
26
27
28
29
30
31
32
33
34
35
36
37
38
39
40
41
42
43
44
45
46
47
48
49
50
51
52
53
54
public OkHttpClient() {
this(new Builder());
}

OkHttpClient(Builder builder) {
this.dispatcher = builder.dispatcher;
this.proxy = builder.proxy;
this.protocols = builder.protocols;
this.connectionSpecs = builder.connectionSpecs;
this.interceptors = Util.immutableList(builder.interceptors);
this.networkInterceptors = Util.immutableList(builder.networkInterceptors);
this.eventListenerFactory = builder.eventListenerFactory;
this.proxySelector = builder.proxySelector;
this.cookieJar = builder.cookieJar;
this.cache = builder.cache;
this.internalCache = builder.internalCache;
this.socketFactory = builder.socketFactory;

boolean isTLS = false;
for (ConnectionSpec spec : connectionSpecs) {
isTLS = isTLS || spec.isTls();
}

if (builder.sslSocketFactory != null || !isTLS) {
this.sslSocketFactory = builder.sslSocketFactory;
this.certificateChainCleaner = builder.certificateChainCleaner;
} else {
X509TrustManager trustManager = systemDefaultTrustManager();
this.sslSocketFactory = systemDefaultSslSocketFactory(trustManager);
this.certificateChainCleaner = CertificateChainCleaner.get(trustManager);
}

this.hostnameVerifier = builder.hostnameVerifier;
this.certificatePinner = builder.certificatePinner.withCertificateChainCleaner(
certificateChainCleaner);
this.proxyAuthenticator = builder.proxyAuthenticator;
this.authenticator = builder.authenticator;
this.connectionPool = builder.connectionPool;
this.dns = builder.dns;
this.followSslRedirects = builder.followSslRedirects;
this.followRedirects = builder.followRedirects;
this.retryOnConnectionFailure = builder.retryOnConnectionFailure;
this.connectTimeout = builder.connectTimeout;
this.readTimeout = builder.readTimeout;
this.writeTimeout = builder.writeTimeout;
this.pingInterval = builder.pingInterval;

if (interceptors.contains(null)) {
throw new IllegalStateException("Null interceptor: " + interceptors);
}
if (networkInterceptors.contains(null)) {
throw new IllegalStateException("Null network interceptor: " + networkInterceptors);
}
}

主要是将builder中的参数取出来.
我们去看看这个this(new Builder())中Builder()的构造函数

1
2
3
4
5
6
7
8
9
10
11
12
13
14
15
16
17
18
19
20
21
22
public Builder() {
dispatcher = new Dispatcher();
protocols = DEFAULT_PROTOCOLS;
connectionSpecs = DEFAULT_CONNECTION_SPECS;
eventListenerFactory = EventListener.factory(EventListener.NONE);
proxySelector = ProxySelector.getDefault();
cookieJar = CookieJar.NO_COOKIES;
socketFactory = SocketFactory.getDefault();
hostnameVerifier = OkHostnameVerifier.INSTANCE;
certificatePinner = CertificatePinner.DEFAULT;
proxyAuthenticator = Authenticator.NONE;
authenticator = Authenticator.NONE;
connectionPool = new ConnectionPool();
dns = Dns.SYSTEM;
followSslRedirects = true;
followRedirects = true;
retryOnConnectionFailure = true;
connectTimeout = 10_000;
readTimeout = 10_000;
writeTimeout = 10_000;
pingInterval = 0;
}

可以看到是一堆默认配置, 注意这个Builder是OkHttpClient这个类中的一个内部类, 采用的当然是比较常见的Builder设计模式.

Request

这里我们顺带看一下Request的构建过程, 因为这个其实不是重点.
Request的构建一般是这样的

1
Request request = new Request.Builder().url("https://www.toutiao.com/search/suggest/initial_page/").build();

点进去看一眼

1
2
3
4
public Builder() {
this.method = "GET";
this.headers = new Headers.Builder();
}
1
2
3
4
5
6
7
8
9
10
11
12
13
14
15
16
17
18
19
20
public Builder url(String url) {
if (url == null) throw new NullPointerException("url == null");

// Silently replace web socket URLs with HTTP URLs.
if (url.regionMatches(true, 0, "ws:", 0, 3)) {
url = "http:" + url.substring(3);
} else if (url.regionMatches(true, 0, "wss:", 0, 4)) {
url = "https:" + url.substring(4);
}

HttpUrl parsed = HttpUrl.parse(url);
if (parsed == null) throw new IllegalArgumentException("unexpected url: " + url);
return url(parsed);
}

public Builder url(HttpUrl url) {
if (url == null) throw new NullPointerException("url == null");
this.url = url;
return this;
}

看起来只是对url进行校验和赋值

Call

从这里开始就是重点了.

1
Call call = client.newCall(request);

我们调用这句产生一个Call对象

1
call.execute();

然后调用这句发起一个同步的网络请求(按照从易到难的顺序, 我们先看同步请求)
在上面两句代码中, 我们先看Call对象是怎么产生的

1
2
3
@Override public Call newCall(Request request) {
return RealCall.newRealCall(this, request, false /* for web socket */);
}

再跟进去

1
2
3
4
5
6
7
8
9
10
11
12
13
14
15
16
17
/**
*归属类: RealCall
*/

static RealCall newRealCall(OkHttpClient client, Request originalRequest, boolean forWebSocket) {
// Safely publish the Call instance to the EventListener.
RealCall call = new RealCall(client, originalRequest, forWebSocket);
call.eventListener = client.eventListenerFactory().create(call);
return call;
}

private RealCall(OkHttpClient client, Request originalRequest, boolean forWebSocket) {
this.client = client;
this.originalRequest = originalRequest;
this.forWebSocket = forWebSocket;
this.retryAndFollowUpInterceptor = new RetryAndFollowUpInterceptor(client, forWebSocket);
}

可见这个Call对象其实是一个RealCall的对象, 值得注意的是RealCall现在有了client对象的引用.
因为要执行一个同步请求我们调用的是RealCall的execute()方法, 所以我们现在去看看这个方法

1
2
3
4
5
6
7
8
9
10
11
12
13
14
15
16
17
18
19
20
21
22
23
24
25
26
27
28
29

/**
*归属类: RealCall
*/

@Override public Response execute() throws IOException {
synchronized (this) {
// 如果这个RealCall已经被执行过了, 再次执行就会抛出异常
if (executed) throw new IllegalStateException("Already Executed");
// 标记自己已经被执行过了
executed = true;
}
captureCallStackTrace();
eventListener.callStart(this);
try {
// 请求开始, 将自己加入到runningSyncCalls队列中
client.dispatcher().executed(this);
// 得到响应的Response, 将其返回
Response result = getResponseWithInterceptorChain();
if (result == null) throw new IOException("Canceled");
return result;
} catch (IOException e) {
eventListener.callFailed(this, e);
throw e;
} finally {
// 请求完成, 将其从runningSyncCalls队列中移除
client.dispatcher().finished(this);
}
}

有些解读我已经在代码中做了注释.
好, 重点来了, 那就是getResponseWithInterceptorChain()这句代码, 看起来只是一句代码就得到了Response, 似乎十分轻松, 但是这其中其实要经历多个拦截器的过程.我们赶紧跟过去看看.

1
2
3
4
5
6
7
8
9
10
11
12
13
14
15
16
17
18
19
20
21
22
23
24

/**
*归属类: RealCall
*/

Response getResponseWithInterceptorChain() throws IOException {
// Build a full stack of interceptors.
List<Interceptor> interceptors = new ArrayList<>();
interceptors.addAll(client.interceptors());
interceptors.add(retryAndFollowUpInterceptor);
interceptors.add(new BridgeInterceptor(client.cookieJar()));
interceptors.add(new CacheInterceptor(client.internalCache()));
interceptors.add(new ConnectInterceptor(client));
if (!forWebSocket) {
interceptors.addAll(client.networkInterceptors());
}
interceptors.add(new CallServerInterceptor(forWebSocket));

Interceptor.Chain chain = new RealInterceptorChain(interceptors, null, null, null, 0,
originalRequest, this, eventListener, client.connectTimeoutMillis(),
client.readTimeoutMillis(), client.writeTimeoutMillis());

return chain.proceed(originalRequest);
}

这里先是new了一个Interceptor的集合, 然后将各类Interceptor

  • client中定义的Interceptor
  • retryAndFollowUpInterceptor(负责失败重试以及重定向)
  • BridgeInterceptor(负责把用户构造的请求转换为发送到服务器的请求、把服务器返回的响应转换为用户友好的响应)
  • CacheInterceptor(负责读取缓存直接返回、更新缓存)
  • ConnectInterceptor(负责和服务器建立连接)
  • networkInterceptors(配置client时设置的interceptor)
  • CallServerInterceptor(负责向服务器发送请求数据、从服务器读取响应数据)

全部加入到集合中
然后new了一个RealInterceptorChain, 注意在new这个对象的时候传入了Interceptor的集合和一个index(数值为0)

1
2
3
4
5
6
7
8
9
10
11
12
13
14
15
16
17
18
19
20

/**
*归属类: RealInterceptorChain
*/

public RealInterceptorChain(List<Interceptor> interceptors, StreamAllocation streamAllocation,
HttpCodec httpCodec, RealConnection connection, int index, Request request, Call call,
EventListener eventListener, int connectTimeout, int readTimeout, int writeTimeout) {
this.interceptors = interceptors;
this.connection = connection;
this.streamAllocation = streamAllocation;
this.httpCodec = httpCodec;
this.index = index;
this.request = request;
this.call = call;
this.eventListener = eventListener;
this.connectTimeout = connectTimeout;
this.readTimeout = readTimeout;
this.writeTimeout = writeTimeout;
}

接着我们看到调用了这个chain的proceed(request)方法, Response也是由这个方法返回的, 我们跟过去看看

1
2
3
4
5
6
7
8
9
10
11
12
13
14
15
16
17
18
19
20
21
22
23
24
25
26
27
28
29
30
31
32
33
34
35
36
37
38
39
40
41
42
43
44
45
46
47
48
49
50
51
/**
*归属类: RealInterceptorChain
*/

@Override public Response proceed(Request request) throws IOException {
return proceed(request, streamAllocation, httpCodec, connection);
}

public Response proceed(Request request, StreamAllocation streamAllocation, HttpCodec httpCodec,
RealConnection connection) throws IOException {
if (index >= interceptors.size()) throw new AssertionError();

calls++;

// If we already have a stream, confirm that the incoming request will use it.
if (this.httpCodec != null && !this.connection.supportsUrl(request.url())) {
throw new IllegalStateException("network interceptor " + interceptors.get(index - 1)
+ " must retain the same host and port");
}

// If we already have a stream, confirm that this is the only call to chain.proceed().
if (this.httpCodec != null && calls > 1) {
throw new IllegalStateException("network interceptor " + interceptors.get(index - 1)
+ " must call proceed() exactly once");
}

// Call the next interceptor in the chain.
RealInterceptorChain next = new RealInterceptorChain(interceptors, streamAllocation, httpCodec,
connection, index + 1, request, call, eventListener, connectTimeout, readTimeout,
writeTimeout);
Interceptor interceptor = interceptors.get(index);
Response response = interceptor.intercept(next);

// Confirm that the next interceptor made its required call to chain.proceed().
if (httpCodec != null && index + 1 < interceptors.size() && next.calls != 1) {
throw new IllegalStateException("network interceptor " + interceptor
+ " must call proceed() exactly once");
}

// Confirm that the intercepted response isn't null.
if (response == null) {
throw new NullPointerException("interceptor " + interceptor + " returned null");
}

if (response.body() == null) {
throw new IllegalStateException(
"interceptor " + interceptor + " returned a response with no body");
}

return response;
}

因为调用的是第二个重载方法, 所以我们直接看第二个.
为了说明清楚, 我直接将第二个重载方法中的重点代码截图

还记得刚刚在RealCall中传入进来的index是多少吗?是0
在这里就会先构造一个RealIntercepterChain的对象(下一个要执行proceed(Request request)的对象), 类似于之前在RealCall中的getResponseWithInterceptorChain()
方法, 将interceptors和index(现在等于1)传进去, 然后从interceptors中取出第一个(index为0)interceptor, 调用interceptor的intercept(Chain chain)方法,
Response也是由这个方法返回的.
而这个intercept(Chain chain)方法是接口Interceptor中的一个抽象方法, 在Interceptor的各个实现类中会有各自不同的具体的重写

包括我们自己定义的Interceptor中的抽象方法, 比如我们有时候会这样写

1
2
3
4
5
6
7
8
9
10
11
12
13
14
15
OkHttpClient okHttpClient = new OkHttpClient.Builder().addInterceptor(new Interceptor() {
@Override
public Response intercept(Chain chain) throws IOException {
Request request = chain.request();
long t1 = System.nanoTime();
Log.i(TAG, String.format("Sending request %s on %s%n%s", request.url(),
chain.connection(), request.headers()));
Response response = chain.proceed(request);
long t2 = System.nanoTime();
Log.i(TAG, String.format("Received response for %s in %.1fms%n%s",
response.request().url(), (t2 - t1) / 1e6d, response.headers()));
return response;
}
}).build();
...

接下来我们以RetryAndFollowUpInterceptor举例子(按照顺序来, 假设client中没有添加任何inteceptor, 那么index为0的就是一个RetryAndFollowUpInterceptor)
, 看看它里面的intercept()方法

RetryAndFollowUpInterceptor

1
2
3
4
5
6
7
8
9
10
11
12
13
14
15
16
17
18
19
20
21
22
23
24
25
26
27
28
29
30
31

/**
*归属类: RetryAndFollowUpInterceptor
*/

@Override public Response intercept(Chain chain) throws IOException {
Request request = chain.request();
RealInterceptorChain realChain = (RealInterceptorChain) chain;
Call call = realChain.call();
EventListener eventListener = realChain.eventListener();

StreamAllocation streamAllocation = new StreamAllocation(client.connectionPool(),
createAddress(request.url()), call, eventListener, callStackTrace);
this.streamAllocation = streamAllocation;

int followUpCount = 0;
Response priorResponse = null;
while (true) {
if (canceled) {
streamAllocation.release();
throw new IOException("Canceled");
}

Response response;
boolean releaseConnection = true;
try {
response = realChain.proceed(request, streamAllocation, null, null);
releaseConnection = false;
} catch (RouteException e)
...
}

(⊙﹏⊙)b这个代码确实有点长, 我们直接看Response从哪里获取的, 我就直接说重点了, 看我截图

看到那个高亮的realChain了吗?就是我们刚刚在RealInterceptor中传进来的一个RealInterceptorChain对象, 这里又会去调用RealInterceptor的proceed()方法:
传入index + 1生成一个新的RealInterceptorChain对象, 从interceptors中取出下一个interceptor, 调用interceptor的intercept(Chain).

总结来说就是在RealInterceptorChain的proceed()方法中调用interceptor的intercept()方法, 在interceptor的intercept()方法中又调用RealInterceptorChain的proceed()方法…

来张图吧, 更清楚一些

这样一层层传递下去, 直到在CallServerInterceptor的intercept(Chain chain)才会结束并将Response返回.
而为了将这个事件传递下去, 我们自己写的interceptor在重写intercept()方法中, 必须返回chain.proceed(request), 否则就无法将其传递下去.你要是敢返回null就会报错.

异常是在RealInterceptorChain的这里抛出的

这种机制模式据称叫责任链模式, 可能okhttp的精髓也在于此了.View的事件分发其实也类似于此.
不过当然, 我这里说的都是”主线剧情”, 也就是网络请求一帆风顺的时候, 对于”支线剧情”错误的处理, 这里就不再展开赘述了.

CacheInterceptor

1
2
3
4
5
6
7
8
9
10
11
12
13
14
15
16
17
18
19
20
21
22
23
24
25
26
27
28
29
30
31
32
33
34
35
36
37
38
39
40
41
42
43
44
45
46
47
48
49
50
51
52
53
54
55
56
57
58
59
60
61
62
63
64
65
66
67
68
69
70
71
72
73
74
75
76
77
78
79
80
81
82
83
84
85
86
87
88
89
90
91
92
93
94
95
96
97
98
99
100
101
102
103
104
105
@Override public Response intercept(Chain chain) throws IOException {
// 得到 request 对应缓存中的 response
Response cacheCandidate = cache != null
? cache.get(chain.request())
: null;

// 获取当前时间
long now = System.currentTimeMillis();

// 获取缓存策略
CacheStrategy strategy = new CacheStrategy.Factory(now, chain.request(), cacheCandidate).get();
Request networkRequest = strategy.networkRequest;
Response cacheResponse = strategy.cacheResponse;

if (cache != null) {
// 追踪缓存, 其实就是计数
cache.trackResponse(strategy);
}

// 如果没有缓存不适用, 关闭缓存
if (cacheCandidate != null && cacheResponse == null) {
closeQuietly(cacheCandidate.body()); // The cache candidate wasn't applicable. Close it.
}

// If we're forbidden from using the network and the cache is insufficient, fail.
// 禁止网络并且没有缓存的话,返回失败
if (networkRequest == null && cacheResponse == null) {
return new Response.Builder()
.request(chain.request())
.protocol(Protocol.HTTP_1_1)
.code(504)
.message("Unsatisfiable Request (only-if-cached)")
.body(Util.EMPTY_RESPONSE)
.sentRequestAtMillis(-1L)
.receivedResponseAtMillis(System.currentTimeMillis())
.build();
}

// If we don't need the network, we're done.
// 如果我们只需要缓存的数据, 不需要网络的数据, 直接返回, 不会再调用后面的拦截器了
if (networkRequest == null) {
return cacheResponse.newBuilder()
.cacheResponse(stripBody(cacheResponse))
.build();
}

Response networkResponse = null;
try {
// 从网络获取缓存
networkResponse = chain.proceed(networkRequest);
} finally {
// If we're crashing on I/O or otherwise, don't leak the cache body.
if (networkResponse == null && cacheCandidate != null) {
closeQuietly(cacheCandidate.body());
}
}

// If we have a cache response too, then we're doing a conditional get.
// 如果我们既有网络response也有缓存response, 那就根据条件进行一个选择
if (cacheResponse != null) {
if (networkResponse.code() == HTTP_NOT_MODIFIED) {
Response response = cacheResponse.newBuilder()
.headers(combine(cacheResponse.headers(), networkResponse.headers()))
.sentRequestAtMillis(networkResponse.sentRequestAtMillis())
.receivedResponseAtMillis(networkResponse.receivedResponseAtMillis())
.cacheResponse(stripBody(cacheResponse))
.networkResponse(stripBody(networkResponse))
.build();
networkResponse.body().close();

// Update the cache after combining headers but before stripping the
// Content-Encoding header (as performed by initContentStream()).
cache.trackConditionalCacheHit(); // 标记缓存命中
cache.update(cacheResponse, response); // 更新缓存
return response;
} else {
closeQuietly(cacheResponse.body());
}
}

Response response = networkResponse.newBuilder()
.cacheResponse(stripBody(cacheResponse))
.networkResponse(stripBody(networkResponse))
.build();

if (cache != null) {
if (HttpHeaders.hasBody(response) && CacheStrategy.isCacheable(response, networkRequest)) {
// Offer this request to the cache.
// 将网络response写入缓存
CacheRequest cacheRequest = cache.put(response);
return cacheWritingResponse(cacheRequest, response);
}

// 如果不是get请求, 删除这个缓存
if (HttpMethod.invalidatesCache(networkRequest.method())) {
try {
cache.remove(networkRequest);
} catch (IOException ignored) {
// The cache cannot be written.
}
}
}

return response;
}

对于这块代码的解读基本上在注释里已经写清楚了.注意到一点, Okhttp只缓存get请求, 可以看一下HttpMethod.invalidatesCache()这个方法便知道

1
2
3
4
5
6
7
public static boolean invalidatesCache(String method) {
return method.equals("POST")
|| method.equals("PATCH")
|| method.equals("PUT")
|| method.equals("DELETE")
|| method.equals("MOVE"); // WebDAV
}

另外我还想知道okhttp的缓存策略是怎样的, 我们追踪cache.put(response)这个方法
最终追踪到的是一个Cache类里面

可以看到用的也是DiskLruCache, 我们知道DiskLruCache是需要指定一个缓存目录的, 然后我翻遍了源码也没有找到默认的文件保存路径, 可见这是需要我们自己指定的, 像这样

1
2
3
OkHttpClient client = new OkHttpClient
.Builder()
.cache(FileUtil.getCache()).build();

ConnectInterceptor

现在我们看看ConnectInterceptor, 它的主要作用是建立连接

1
2
3
4
5
6
7
8
9
10
11
12
@Override public Response intercept(Chain chain) throws IOException {
RealInterceptorChain realChain = (RealInterceptorChain) chain;
Request request = realChain.request();
StreamAllocation streamAllocation = realChain.streamAllocation();

// We need the network to satisfy this request. Possibly for validating a conditional GET.
boolean doExtensiveHealthChecks = !request.method().equals("GET");
HttpCodec httpCodec = streamAllocation.newStream(client, chain, doExtensiveHealthChecks);
RealConnection connection = streamAllocation.connection();

return realChain.proceed(request, streamAllocation, httpCodec, connection);
}

这里调用了 streamAllocation.newStream 创建了一个 HttpCodec 的对象

而 HttpCodec 是一个抽象类,其实现类分别是 Http1Codec 和 Http2Codec 。相对应的就是 HTTP/1.1 和 HTTP/2.0。在 Http1Codec 中,它利用 Okio 对 Socket 的读写操作进行封装

我们来看下streamAllocation.newStream(client, chain, doExtensiveHealthChecks)的代码

1
2
3
4
5
6
7
8
9
10
11
12
13
14
15
16
17
18
19
20
21
public HttpCodec newStream(
OkHttpClient client, Interceptor.Chain chain, boolean doExtensiveHealthChecks) {
int connectTimeout = chain.connectTimeoutMillis();
int readTimeout = chain.readTimeoutMillis();
int writeTimeout = chain.writeTimeoutMillis();
int pingIntervalMillis = client.pingIntervalMillis();
boolean connectionRetryEnabled = client.retryOnConnectionFailure();

try {
RealConnection resultConnection = findHealthyConnection(connectTimeout, readTimeout,
writeTimeout, pingIntervalMillis, connectionRetryEnabled, doExtensiveHealthChecks);
HttpCodec resultCodec = resultConnection.newCodec(client, chain, this);

synchronized (connectionPool) {
codec = resultCodec;
return resultCodec;
}
} catch (IOException e) {
throw new RouteException(e);
}
}

而创建 HttpCodec 对象的过程涉及到 StreamAllocation、RealConnection,代码较长,这里就不展开,这个过程概括来说,就是在连接池中找到一个可用的 RealConnection,再利用 RealConnection 的输入输出(BufferedSource 和 BufferedSink)创建 HttpCodec 对象,供后续步骤使用。

CallServerInterceptor

CallServerInterceptor是集合interceptors中的最后一个interceptor, 如果前面都没有return Response的话, 在这里就应该将Response返回了, 所以在这里你是搜不到chain.proceed()方法的.

1
2
3
4
5
6
7
8
9
10
11
12
13
14
15
16
17
18
19
20
21
22
23
24
25
26
27
28
29
30
31
32
33
34
35
36
37
38
39
40
41
42
43
44
45
46
47
48
49
50
51
52
53
54
55
56
57
58
59
60
61
62
63
64
65
66
67
68
69
70
71
72
73
74
75
76
77
78
79
80
81
82
83
84
85
86
87
88
89
90
91
92
93
94
95
96
97
98
99
100
@Override public Response intercept(Chain chain) throws IOException {
RealInterceptorChain realChain = (RealInterceptorChain) chain;
HttpCodec httpCodec = realChain.httpStream();
StreamAllocation streamAllocation = realChain.streamAllocation();
RealConnection connection = (RealConnection) realChain.connection();
Request request = realChain.request();

long sentRequestMillis = System.currentTimeMillis();

realChain.eventListener().requestHeadersStart(realChain.call());
httpCodec.writeRequestHeaders(request);
realChain.eventListener().requestHeadersEnd(realChain.call(), request);

Response.Builder responseBuilder = null;
if (HttpMethod.permitsRequestBody(request.method()) && request.body() != null) {
// If there's a "Expect: 100-continue" header on the request, wait for a "HTTP/1.1 100
// Continue" response before transmitting the request body. If we don't get that, return
// what we did get (such as a 4xx response) without ever transmitting the request body.
if ("100-continue".equalsIgnoreCase(request.header("Expect"))) {
httpCodec.flushRequest();
realChain.eventListener().responseHeadersStart(realChain.call());
responseBuilder = httpCodec.readResponseHeaders(true);
}

if (responseBuilder == null) {
// Write the request body if the "Expect: 100-continue" expectation was met.
realChain.eventListener().requestBodyStart(realChain.call());
long contentLength = request.body().contentLength();
CountingSink requestBodyOut =
new CountingSink(httpCodec.createRequestBody(request, contentLength));
BufferedSink bufferedRequestBody = Okio.buffer(requestBodyOut);

request.body().writeTo(bufferedRequestBody);
bufferedRequestBody.close();
realChain.eventListener()
.requestBodyEnd(realChain.call(), requestBodyOut.successfulCount);
} else if (!connection.isMultiplexed()) {
// If the "Expect: 100-continue" expectation wasn't met, prevent the HTTP/1 connection
// from being reused. Otherwise we're still obligated to transmit the request body to
// leave the connection in a consistent state.
streamAllocation.noNewStreams();
}
}

httpCodec.finishRequest();

if (responseBuilder == null) {
realChain.eventListener().responseHeadersStart(realChain.call());
responseBuilder = httpCodec.readResponseHeaders(false);
}

Response response = responseBuilder
.request(request)
.handshake(streamAllocation.connection().handshake())
.sentRequestAtMillis(sentRequestMillis)
.receivedResponseAtMillis(System.currentTimeMillis())
.build();

int code = response.code();
if (code == 100) {
// server sent a 100-continue even though we did not request one.
// try again to read the actual response
responseBuilder = httpCodec.readResponseHeaders(false);

response = responseBuilder
.request(request)
.handshake(streamAllocation.connection().handshake())
.sentRequestAtMillis(sentRequestMillis)
.receivedResponseAtMillis(System.currentTimeMillis())
.build();

code = response.code();
}

realChain.eventListener()
.responseHeadersEnd(realChain.call(), response);

if (forWebSocket && code == 101) {
// Connection is upgrading, but we need to ensure interceptors see a non-null response body.
response = response.newBuilder()
.body(Util.EMPTY_RESPONSE)
.build();
} else {
response = response.newBuilder()
.body(httpCodec.openResponseBody(response))
.build();
}

if ("close".equalsIgnoreCase(response.request().header("Connection"))
|| "close".equalsIgnoreCase(response.header("Connection"))) {
streamAllocation.noNewStreams();
}

if ((code == 204 || code == 205) && response.body().contentLength() > 0) {
throw new ProtocolException(
"HTTP " + code + " had non-zero Content-Length: " + response.body().contentLength());
}

return response;
}

这里因为我对底层的网络协议并不是太熟悉, 就直接引用别人的结论了.

这里我们可以看到,核心工作都由 HttpCodec 对象完成,而 HttpCodec 实际上利用的是 Okio,而 Okio 实际上还是用的 Socket,所以没什么神秘的,只不过一层套一层,层数有点多。

异步的网络请求

在实际开发中我们用的最多的其实还是异步的请求方式

1
2
3
4
5
6
7
8
9
10
11
12
13
14

/**
*归属类: RealCall
*/

@Override public void enqueue(Callback responseCallback) {
synchronized (this) {
if (executed) throw new IllegalStateException("Already Executed");
executed = true;
}
captureCallStackTrace();
eventListener.callStart(this);
client.dispatcher().enqueue(new AsyncCall(responseCallback));
}

这里还有一个很重要的参与者Dispatcher, 中文意思调度器, 它的源码我们一会儿再说.现在我们跟过去看看它的enqueue()方法

1
2
3
4
5
6
7
8
synchronized void enqueue(AsyncCall call) {
if (runningAsyncCalls.size() < maxRequests && runningCallsForHost(call) < maxRequestsPerHost) {
runningAsyncCalls.add(call);
executorService().execute(call);
} else {
readyAsyncCalls.add(call);
}
}

如果当前还能执行一个并发请求,那就将这个请求加入 runningAsyncCalls 队列, 然后立即执行,否则加入 readyAsyncCalls 队列.
这里的executorService()返回的其实是一个线程池对象, 这里的call对象是一个AsyncCall对象, 那么这个AsyncCall类一定是实现了Runnable接口, 重写了run()方法, 那我们去看看这个AsyncCall类的run()方法是怎样的.
这是我们发现AsyncCall是继承了NamedRunnable这个抽象类的, NamedRunnable替AsyncCall实现了run()方法

1
2
3
4
5
6
7
8
9
10
11
12
13
14
15
16
17
18
19
public abstract class NamedRunnable implements Runnable {
protected final String name;

public NamedRunnable(String format, Object... args) {
this.name = Util.format(format, args);
}

@Override public final void run() {
String oldName = Thread.currentThread().getName();
Thread.currentThread().setName(name);
try {
execute();
} finally {
Thread.currentThread().setName(oldName);
}
}

protected abstract void execute();
}

但是在重写的run()方法中调用了抽象方法execute(), 所以这个execure()方法就需要AsyncCall自己去实现了, 我们去看一下

1
2
3
4
5
6
7
8
9
10
11
12
13
14
15
16
17
18
19
20
21
22
23
24
  @Override protected void execute() {
boolean signalledCallback = false;
try {
Response response = getResponseWithInterceptorChain();
if (retryAndFollowUpInterceptor.isCanceled()) {
signalledCallback = true;
responseCallback.onFailure(RealCall.this, new IOException("Canceled"));
} else {
signalledCallback = true;
responseCallback.onResponse(RealCall.this, response);
}
} catch (IOException e) {
if (signalledCallback) {
// Do not signal the callback twice!
Platform.get().log(INFO, "Callback failure for " + toLoggableString(), e);
} else {
eventListener.callFailed(RealCall.this, e);
responseCallback.onFailure(RealCall.this, e);
}
} finally {
client.dispatcher().finished(this);
}
}
}

在这里我们又看到之前看到的getResponseWithInterceptorChain()
方法, 刚才已经分析过了.并且在这里还能看到我们传入进去的responseCallback对象在这里被调用了, 返回请求失败或者response.在finally中也就是请求结束之后, 会调用Dispatcher的finished()方法, 我们去看看

1
2
3
4
5
6
7
8
9
10
11
12
13
14
15
16
17
18
19
20
21
22
23
24
25
26
27
28
29
30
31
32
33
34
35
36
37
38
39
40
41
42
43
  void finished(AsyncCall call) {
finished(runningAsyncCalls, call, true);
}

/** Used by {@code Call#execute} to signal completion. */
void finished(RealCall call) {
finished(runningSyncCalls, call, false);
}

private <T> void finished(Deque<T> calls, T call, boolean promoteCalls) {
int runningCallsCount;
Runnable idleCallback;
synchronized (this) {
if (!calls.remove(call)) throw new AssertionError("Call wasn't in-flight!");
if (promoteCalls) promoteCalls();
runningCallsCount = runningCallsCount();
idleCallback = this.idleCallback;
}

if (runningCallsCount == 0 && idleCallback != null) {
idleCallback.run();
}
}
```
重点在于promoteCalls()方法

``` java
private void promoteCalls() {
if (runningAsyncCalls.size() >= maxRequests) return; // Already running max capacity.
if (readyAsyncCalls.isEmpty()) return; // No ready calls to promote.

for (Iterator<AsyncCall> i = readyAsyncCalls.iterator(); i.hasNext(); ) {
AsyncCall call = i.next();

if (runningCallsForHost(call) < maxRequestsPerHost) {
i.remove();
runningAsyncCalls.add(call);
executorService().execute(call);
}

if (runningAsyncCalls.size() >= maxRequests) return; // Reached max capacity.
}
}

可见在请求结束之后, 会将readyAsyncCalls 队列中的call对象取出来, 加入到runningAsyncCalls 队列中, 然后立即执行.

Dispatcher

Dispatcher也是阅读okhttp源码时不可忽略的一个类.记得上面在RealCall的enqueue(Callback)方法中, 调用了Dispatcher的enqueue()方法, 现在我们去看看这个类

1
2
3
4
5
6
7
8
9
10
11
12
13
14
15
16
17
18
19
20
21
22
23
24
25
26
27
28
29
30
31
32
33

public final class Dispatcher {
private int maxRequests = 64;
private int maxRequestsPerHost = 5;
private @Nullable Runnable idleCallback;

/** Executes calls. Created lazily. */
private @Nullable ExecutorService executorService;

/** Ready async calls in the order they'll be run. */
private final Deque<AsyncCall> readyAsyncCalls = new ArrayDeque<>();

/** Running asynchronous calls. Includes canceled calls that haven't finished yet. */
private final Deque<AsyncCall> runningAsyncCalls = new ArrayDeque<>();

/** Running synchronous calls. Includes canceled calls that haven't finished yet. */
private final Deque<RealCall> runningSyncCalls = new ArrayDeque<>();

public Dispatcher(ExecutorService executorService) {
this.executorService = executorService;
}

public Dispatcher() {
}

public synchronized ExecutorService executorService() {
if (executorService == null) {
executorService = new ThreadPoolExecutor(0, Integer.MAX_VALUE, 60, TimeUnit.SECONDS,
new SynchronousQueue<Runnable>(), Util.threadFactory("OkHttp Dispatcher", false));
}
return executorService;
}
...

可以看到Dispatcher内部维护了三个双端队列:

  • readyAsyncCalls:准备运行的异步请求
  • runningAsyncCalls:正在运行的异步请求
  • runningSyncCalls:正在运行的同步请求

maxRequests是最大同时请求数量, 大小是64.
我们再看那个executorService, 那个线程池的产生方式.到这里就不得不科普一下线程池的知识了

可以看到okhttp使用的是6个参数的构造函数: corePoolSize是0, maximumPoolSize是无限制, keepAliveTime是60秒, workQueue是一个泛型为runnable是SynchronousQueue, threadFractory是一个自定义的ThreadFactory.下面说说这几个参数的含义:

  1. corePoolSize -> 该线程池中核心线程数最大值
    核心线程:在创建完线程池之后,核心线程先不创建,在接到任务之后创建核心线程。并且会一直存在于线程池中(即使这个线程啥都不干),有任务要执行时,如果核心线程没有被占用,会优先用核心线程执行任务。数量一般情况下设置为 CPU 核数的二倍即可。默认情况下,假如核心线程被创建了, 即使核心线程没有任务在执行它会一直存活
  2. maximumPoolSize -> 该线程池中线程总数最大值
    非核心线程:简单理解,即核心线程都被占用,但还有任务要做,就创建非核心线程
  3. keepAliveTime -> 非核心线程闲置超时时长
    这个参数可以理解为,任务少,但池中线程多,非核心线程不能白养着,超过这个时间不工作的就会被干掉,但是核心线程会保留。
  4. TimeUnit -> keepAliveTime 的单位
  5. BlockingQueue workQueue -> 线程池中的任务队列
    默认情况下,任务进来之后先分配给核心线程执行,核心线程如果都被占用,并不会立刻开启非核心线程执行任务,而是将任务插入任务队列等待执行,核心线程会从任务队列取任务来执行,任务队列可以设置最大值,一旦插入的任务足够多,达到最大值,才会创建非核心线程执行任务。
    常见的 workQueue 有四种:SynchronousQueue、LinkedBlockingQueue、ArrayBlockingQueue、DelayQueue
    因篇幅有限, 我这里只说一下SynchronousQueue
    SynchronousQueue:这个队列接收到任务的时候,会直接提交给线程处理,而不保留它,如果所有线程都在工作怎么办?那就新建一个线程来处理这个任务!所以为了保证不出现 < 线程数达到了maximumPoolSize而不能新建线程 > 的错误,使用这个类型队列的时候,maximumPoolSize一般指定成 Integer.MAX_VALUE,即无限大.
  6. ThreadFactory threadFactory -> 创建线程的工厂
    可以用线程工厂给每个创建出来的线程设置名字。一般情况下无须设置该参数。

可见这里创建的是一个核心线程为0的线程池,它不保留任何核心线程,随时创建更多的线程数,当线程空闲时只能活60秒. 创建线程使用的是一个叫做 “OkHttp Dispatcher” 的线程工厂。也就是说,在实际运行中,当收到 10 个并发请求时,线程池会创建十个线程,当工作完成后,线程池会在 60s 后相继关闭所有线程。以上关于线程池的参考自
别再说你不懂线程池——做个优雅的攻城狮
Android 线程池得要这么用
Android 线程和线程池一篇就够了

addNetworkInterceptor和addInterceptor的区别

关于看到addNetworkInterceptor和addInterceptor有人是这样说的

addNetworkInterceptor添加的是网络拦截器,他会在在request和resposne是分别被调用一次
addinterceptor添加的是aplication拦截器,他只会在response被调用一次

然而事实真的是这样吗?我们写代码测试一下

1
2
3
4
5
6
7
8
9
10
11
12
13
14
15
16
17
18
19
20
21
22
23
24
25
26
27
28
29
30
31
32
OkHttpClient okHttpClient = new OkHttpClient.Builder().addInterceptor(new Interceptor() {
@Override
public Response intercept(Chain chain) throws IOException {
Log.i(TAG, "addInterceptor");
Request request = chain.request();
Response response = chain.proceed(request);
return response;
}
}).addNetworkInterceptor(new Interceptor() {
@Override
public Response intercept(Chain chain) throws IOException {
Log.i(TAG, "addNetworkInterceptor");
Request request = chain.request();
Response response = chain.proceed(request);
return response;
}
}).build();
Request request =
new Request.Builder().url("https://www.toutiao.com/search/suggest/initial_page/")
.build();
Call call = okHttpClient.newCall(request);
call.enqueue(new Callback() {
@Override
public void onFailure(Call call, IOException e) {

}

@Override
public void onResponse(Call call, Response response) throws IOException {
Log.d(TAG, "response = " + response.body().string());
}
});

我们在intercept和netWorkInterceptor里面分别打印了日志, 然后用了今日头条的一个api测试了一下

结果看到, 发送了两次请求, interceptor和netWorkInterceptor中都分别只调用了一次, 这是不是说网上的说法就是错误的呢?别急, 我们再换一个okhttp官方wiki中的api测试一下

这一次, 我们发现addNetWorkInterceptor中的intercept()方法被调用了两次?这是怎么回事呢?我们打个断点追踪一下堆栈

经过一番排查最终发现是在RetryAndFollowUpInterceptor的intercept()方法里

1
2
3
4
5
6
7
8
9
10
11
12
13
14
15
16
17
18
19
20
21
22
23
24
25
26
27
28
29
30
31
32
33
34
35
36
37
38
39
40
41
42
43
44
45
46
47
48
49
50
51
52
53
54
55
56
57
58
59
60
61
62
63
64
65
66
67
68
69
70
71
72
73
74
75
76
77
78
79
80
81
82
83
84
85
86
87
88
89
90
@Override public Response intercept(Chain chain) throws IOException {
Request request = chain.request();
RealInterceptorChain realChain = (RealInterceptorChain) chain;
Call call = realChain.call();
EventListener eventListener = realChain.eventListener();

StreamAllocation streamAllocation = new StreamAllocation(client.connectionPool(),
createAddress(request.url()), call, eventListener, callStackTrace);
this.streamAllocation = streamAllocation;

int followUpCount = 0;
Response priorResponse = null;
// 注意这里的while循环
while (true) {
if (canceled) {
streamAllocation.release();
throw new IOException("Canceled");
}

Response response;
boolean releaseConnection = true;
try {
response = realChain.proceed(request, streamAllocation, null, null);
releaseConnection = false;
} catch (RouteException e) {
// The attempt to connect via a route failed. The request will not have been sent.
if (!recover(e.getLastConnectException(), streamAllocation, false, request)) {
throw e.getLastConnectException();
}
releaseConnection = false;
continue;
} catch (IOException e) {
// An attempt to communicate with a server failed. The request may have been sent.
boolean requestSendStarted = !(e instanceof ConnectionShutdownException);
if (!recover(e, streamAllocation, requestSendStarted, request)) throw e;
releaseConnection = false;
continue;
} finally {
// We're throwing an unchecked exception. Release any resources.
if (releaseConnection) {
streamAllocation.streamFailed(null);
streamAllocation.release();
}
}

// Attach the prior response if it exists. Such responses never have a body.
if (priorResponse != null) {
response = response.newBuilder()
.priorResponse(priorResponse.newBuilder()
.body(null)
.build())
.build();
}

Request followUp = followUpRequest(response, streamAllocation.route());

// 注意这里的followUpRequest为null时才会跳出这个while循环
if (followUp == null) {
if (!forWebSocket) {
streamAllocation.release();
}
return response;
}

closeQuietly(response.body());

if (++followUpCount > MAX_FOLLOW_UPS) {
streamAllocation.release();
throw new ProtocolException("Too many follow-up requests: " + followUpCount);
}

if (followUp.body() instanceof UnrepeatableRequestBody) {
streamAllocation.release();
throw new HttpRetryException("Cannot retry streamed HTTP body", response.code());
}

if (!sameConnection(response, followUp.url())) {
streamAllocation.release();
streamAllocation = new StreamAllocation(client.connectionPool(),
createAddress(followUp.url()), call, eventListener, callStackTrace);
this.streamAllocation = streamAllocation;
} else if (streamAllocation.codec() != null) {
throw new IllegalStateException("Closing the body of " + response
+ " didn't close its backing stream. Bad interceptor?");
}

request = followUp;
priorResponse = response;
}
}

需要注意的地方我已经在代码里加了注释.这里面有一个while循环, 只有follwUpRequest为null时才会return response跳出循环, 不信打个断点看一下


可以发现这个request重定向到了http://publicobject.com/helloworld.txt地址, 所以while循环里面的代码才会执行两次, 因此也导致RetryAndFollowUpInterceptor后面的拦截器也被调用了两次, 而我们用的今日头条的那个api是没有重定向的, 所以才会只执行一次.其实官方wifi里面也已经说得很清楚了

所以阅读原生资料很重要, 如果英文不好, 推荐看这篇哟
OkHttp 3.x 源码解析之 Interceptor 拦截器

总结

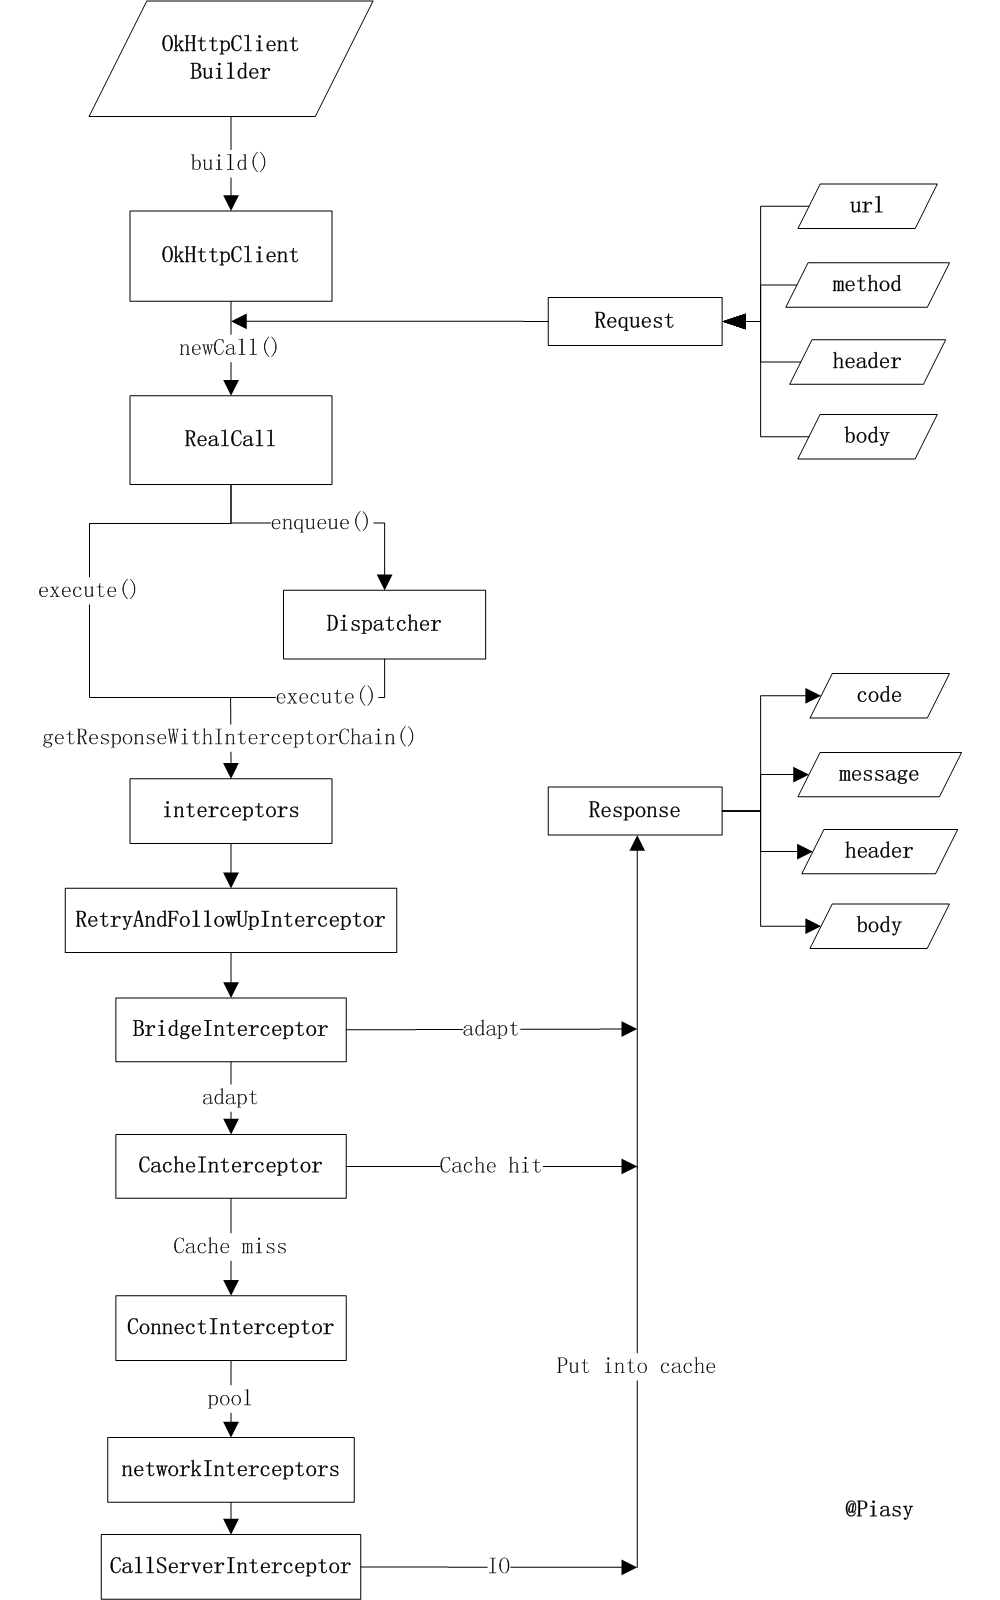
其实还有一些细节没分析, 比如连接池, 具体的底层网络连接等等, 但是我有点累了, 有机会再补充吧. 最后盗用别人的一张完整的流程图回顾一下吧.

0%